Puli Meen


From the Keralite cuisine , Fish in *Kudam Puli- infused Spicy Gravy.

This is a household recipe for many Keralites. Kerala is a state in Southern India , blessed with a very long coast- line. Because of the proximity to the sea and subsequent availability of a variety of fish , majority of Keralites are fish-lovers. Most of our households are blessed with wonder-cooks ( also called "mom"s) who have myriad marine-recipes up their sleeves, to include fish in our daily-diet without causing much boredom to the palette.

My method of making
Puli-meen has evolved from a combination of my mom's and my mom-in-law's methods. My mom has been making Nei-meen ( Indo Pacific King Mackarel/ Seer Fish) curry like this from the time I could remember, and we used to call it **Mulaku-Curry , maybe because of its red-hot-colour. After I got married, I heard Joe rave about his Amachi's (mom's) Puli-meen, and the way he described it , I was sure it was the same Mulaku-curry with a different alias. I had the original recipe from my mom; so during one of my trips to India , I convinced Amachi to let me help her make it. Puli-meen , as Joe claims, is a very Syrian-Christian way for preparing fish with with ginger, garlic, onions and some spices. For the tangy part, Kudam-puli is added instead of tamarind. After couple of attempts, I managed to make a version of Puli-meen in my kitchen, which Joe certifies as " the closest in taste to the authentic one".
Traditionally in Kerala , fish curries are cooked in clay pans ( called
"man-chatti"). It is amazing how this can change the flavor of the curry, and keeps the fish moist even with very little gravy. I managed to get a chatti from one of the Indian grocery stores here in the Bay-Area couple of years back and have been cooking fish in it eversince.

Ingredients:


  • 4 tbs cooking oil
  • 1 tsp black mustard seeds
  • 1 tbs grated ginger ( approximately 1/2 of medium knob)
  • 1 tbs minced garlic ( approximately 4 large cloves)
  • 1/2 cup of pearl onions sliced into quarters
  • 1 stalk of curry leaves
  • 1 tsp coriander powder
  • 3 tsp red-chilly powder ( I prefer to use Kashmiri red-chilly powder)
  • 1/8 tsp fenugreek powder
  • 1/4 tsp turmeric powder
  • 5 slivers of kudam-puli (leave soaked in water for about 5 min before using)
  • 2 cups of water
  • Salt to taste
  • 15-20 pieces of fish ( I used 2 fillets of tilapia )
Cookware : A medium pan ; I prefer to use the man-chatti mentioned above.

Procedure:
  • Set the pan in medium heat and add the oil.
  • Once the oil is smoking hot add the mustard seeds and wait for them to pop.
  • Add the ginger, garlic , curry leaves & onions and saute till they start turning brown.


  • Lower the heat.Add turmeric, red-chilly,coriander & fenugreek powders and saute well ; till they turn really dark in color, almost the darkest brown.
  • Add the water. Once it starts simmering, add the salt & kudam-puli.
  • Let simmer and then add the fish pieces. Cook for for about 10 min. (Cooking time for the fish will vary depending on what variety you use. Adjust accordingly)
Suggested Accompaniments : Rice, Kappa Puzhukku( Mashed Tapioca with Seasonings)
Lifesavers : To get the distinctive flavors of the authentic recipe it is advisable to use traditional ingredients . For eg. substituting the pearl-onions with big onions , would make the gravy a lot milder in taste , because the big onion is sweeter.
* Kudam-puli ( Gambooge) is a fruit indigenous to the South-Western cost of India. The fruit is well known for it's culinary and medicinal uses. The seeds are removed and the rind is sun-dried before it is stored for later use (Available at most Indian stores in the US). It is also well praised for its medicinal value as a digestive aide.
**Mulaku : Chilli


Garlic Rasam


Rasam: Tomato broth with Spices . It is a very common preparation in South India and each region has various versions of it . The basic ingredients are Tomato, Tamarind and some spices . Some prefer to have it as a Soup, where it has the broth like consistency and some like it with rice.

The last week has been bad for me ..It was raining all along and I have caught a cold. Thankfully the two men in the household are up and about and a creating as much of a mess they can with no one to police them. I had a good laugh when another mom from Blu's Class said to me the other day " I would rather my husband or my kid falls sick ..cos if I fall sick the house stops running and it is just chaos".So there I sat, looking almost like Rudolph, with a very red nose (from all the sneezing) and wondering what would help me do away with the sniffles ? The first thing that came to my mind was
Rasam.

Before I get to the recipe , I should tell you a little bit about the person who taught me how to make this. I am blessed to have an amazing cook as a very good friend and next-door neighbor. She is my one-stop-rescue-point for convenient Vegetarian (
Tamizh style) cooking. Rasam is an indispensable item in her diet and, me being a constant visitor at her place, I get to savor it every now-and-then. Her garlic-rasam is a little thicker in consistency than the broth and is a great accompaniment with rice.

Prep time :10 min
Cooking time : 15 min
Makes : 4 servings

Ingredients :
  • 2 large tomatoes , cut into small pieces
  • 3 large cloves of garlic , peeled and crushed
  • 1 tsp of tamarind ( mixed with some water )
  • Salt to taste
  • 1 1/2 tsp of Rasam Powder
  • 2 cups water
For the Seasoning
  • 1 tbs cooking oil
  • 1 tsp black mustard seeds
  • 1/4 tsp cumin seeds
  • 1 pinch (1/8 tsp) of asafoetida
  • 1 stalk of curry leaves
Procedure :
  • In a medium pot cook together the tomato , garlic, salt & tamarind* with half cup of water. Keep Covered.
  • Once the tomatoes are well cooked , using a heavy spoon , mash up tomatoes in the water.
  • Add the rest ( 1 1/2 cups ) of water and let boil for couple of min.
  • In a small skillet, heat oil .
  • Add the mustard seeds . When the mustard seeds start popping , add the cumin seeds , asafoetida & curry leaves and remove from heat.
  • Add to the tomato broth & mix well .
Lifesaver:
*Add the salt and tamarind only in small quantities at a time . Taste in between to see if they are enough. Adjust the quantity accordingly.

Related Recipes : Rasam Powder

Rasam Powder

Prep time : 10 min Yields : Approximately 7 tsp

Ingredients
:
  • 6 tsp Yellow Pigeon Peas ( Thuvara Parippu/ Toor Dal)
  • 2 tsp Coriander Seeds
  • 2 tsp Black Pepper Corns
  • 1/2 tsp Cumin Seeds
Procedure :
  • Dry roast them in a medium skillet till the peas start turning brown.
  • Grind to a fine powder using a spice grinder .
  • Store refrigerated in an airtight container.

Brussel Sprouts


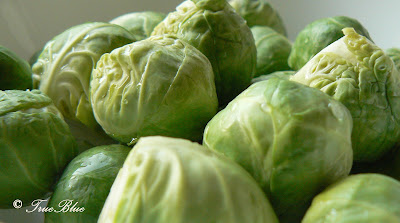
I was reading back on my previous posts the other day and felt the compelling need to cook , and subsequently post, some healthy recipes . So,I was pretty resolute on my last shopping trip and decided to cook some Brussel Sprouts for dinner. Though I felt proud of myself picking up that bag of tiny cabbagey- looking-veggie , I had no idea what-so-ever what I was going to do with it. So I decided to do some groundwork before dishing it up .
As it turns out , the tiny cabbagey-looking-veggie is indeed a variety of cabbage. The prefix "Brussel" was given to it probably because it was cultivated initially in Brussels , now Belgium. They thrive in less than tropical temperatures and probably that's why we don't find them in the Indian market. They are very rich in antioxidants, folic acid and dietary fiber.
The easiest way to include these in you diet is to probably make a salad ; steaming it and then seasoning with salt & pepper. However, I was in a mood to eat some comfort food that day...and needless to say , to a Keralite comfort food has to include rice. That ruled out steamed-sprouts-delight and I was left with two options: a
thoran* or a mezhukkupuratti**. Since it is a variety of cabbage and I love Cabbage thoran the final decision was Brussel Sprouts Thoran.
While cooking the sprouts the only thing to keep in mind is not to over-cook them; about 5 minutes of cooking should be enough. When overcooked it tends to be foul smelling due to the presence of an organic compound , which incidentally, is the same compound that lends it the high-nutrient quality. This is how I made the
thoran :

Prep time :15 min
Cooking time :10 min
Ready in :25 min

Ingedients:
  • 1 lb Brussel Sprouts
  • 1/4 tsp turmeric pwd (optional)
  • Salt to taste
  • 2 tbs grated coconut ( fresh or frozen)
  • 2-3 pearl onions
  • 1 green chilly ( I used a Thai chilly)
  • 1 stalk of curry leaves
  • 1 dried red chilly
  • 1/2 tsp black mustard seeds
  • 1 tbs olive oil


You will also need:
  • 1 medium skillet
Procedure:
  • Wash the Sprouts and slit them in half, running the knife from top to bottom. Cut each half , lengthwise into thin pieces.
  • Coarsely grind together the coconut, onions, green chilly and curry leaves.
  • Set the skillet in medium heat. Add the oil and once it starts smoking add the mustard seeds.Wait for them to pop , and then add the red chilly .
  • Toss in the Sprouts ; add the salt& turmeric powder; keep covered and let it cook in the steam for about 5 min.
  • Remove the lid , add the ground coconut mixture and toss with a spatula. Keep covered for another minute .
  • Remove the lid and check to see if the seasonings are right. Toss lightly with a spatula and remove from heat.
Note : The nutrition information provided below is for 1 serving.


*Thoran : From Keralite cuisine , a dry vegetable side dish with coconut .The vegetables are steamed/ cooked with salt, turmeric powder & chilly powder (optional) and then a coarsely ground mixture of coconut & pearl onions is added. Finally, seasoned with oil,mustard seeds , curry leaves & dry red chilly.
** Mezhukkupuratti: From Keralite cuisine , a dry vegetable side dish. The vegetables are steamed/ cooked in turmeric, red chilly pwd (optional) and salt and then
pan fried with sparse oil.

Ma's Butter Cake


As the title says, this is my mom’s recipe for a simple butter cake. Maybe “simple “ is a little misleading in this case ; it used to take a good 2 to 3 hours for mom from sifting the flour to getting the batter into the oven. This time it took me about an hour to do the prep work, with Blu behind my back checking “if the cake is ready?”. To a cooking-novice the procedure given below might look a bit daunting.. but let me tell you this , it will be worth all the effort.

Prep time: 45 min
Cooking time: 45 min
Ready in: 1 hr 30 min

Makes 16 (or more) servings

Ingredients:
• 1 cup all purpose flour ( 250 grams)
• 1 tsp baking powder
• 4 large eggs ( 250 grams, in room temperature*)
• 1 cup powdered sugar (250 grams)
• 2 sticks of un-salted butter (250 grams, softened in room temperature)
• ½ cup of 2% milk
• 1 tbs vanilla essence
• ½ cup raisins chopped( optional)
• ¼ cup cashews chopped (optional)
• ½ cup walnuts chopped (optional)

You will also need:
• Medium sized Sieve
• Small, Medium & Large Mixing Bowls
• 13”x9” cake pan
• Hand-held blender
• Rubber spatula

Procedure:
Prepping
• Using the sieve sift together the flour and baking powder. Repeat 2-3 times to ensure they mix well
• Separate the egg whites and the yolk ** making sure that the yolk doesn’t break and go into the white. Put the yolks in the small mixing bowl and the whites in the medium mixing bowl.
• Add a pinch of sugar to the egg whites and using the blender whip them till they start making firm peaks.
• Beat the egg yolks till they are all broken down and frothy.

Mixing them in
• In the large mixing bowl combine the butter, powdered sugar, vanilla essence and 2% milk .Beat them together in medium speed till they are well incorporated.
• Add one large spoonful of the flour and baking powder mixture and one large spoonful of the egg-whites into the butter & sugar mixture. Gently fold in*** using a rubber spatula, scraping from the sides as you go.
• Keep adding the flour & egg whites as mentioned above till the entire thing is well incorporated into the cake mixture.
• Add the egg yolks into it and fold in gently.
• Add the fruits and nuts**** and fold in gently.

Getting the batter into the oven
• Preheat the oven to 350 F
• Brush the inside of the cake pan with some butter. Add a tablespoon of flour to it and keep tilting and tapping the pan on the sides till the entire surface is coated with the flour.
• Add the prepared batter to it and bake for about 40-45 min**** or until a toothpick inserted comes clean

Lifesavers:
*It is very important that the eggs be used in room temperature since we want the egg whites to be whipped into firm peaks. The proteins in the egg-white expand better when they are warm. To test if they are right consistency, dip a spoon into it and draw it back; if the whites follow the trail and make a small peak you have got it right.

** For separating the egg whites from the yolk, holding the egg above the medium bowl gently crack them at the center with a knife. Without applying too much pressure open-up the crack and split into two halves, making sure that the yolk remains in one half shell, and letting the white drop into the bowl below. Now, gently slide the yolk into the other half of the shell, letting more of the egg white into the bowl. Repeat this until you have just yolk in the shell and all of the white has gone into the bowl. Try not to get the yolk in the white, it hampers the egg whites from stiffening up when whipped.

***Folding in: Gently run the rubber spatula on the sides on the sides of the bowl, scraping sides as you go, and in one direction. As you complete a circle, bring the spatula in a curved swoop towards the center (so that, all the batter you have accumulated from the sides will now go into the center). This is just a gentler way to get the mixture well incorporated making sure that the whipped egg retains the volume even after the mixing. If you stir briskly, the mixture would be deflated and lose volume, making the cake less fluffy.

**** Here is a tip to make sure that all the fruits and nuts don’t sink into the bottom of the cake while it is being baked. Add a spoonful of dry all-purpose flour to the fruits and nuts and toss well to coat them with flour all over, before you add them to the cake batter.

***** Baking time may vary depending on the individual oven-performance.

Note : The Nutrition Information provided below is for 1 serving of the cake, without the fruits and nuts.

Sweet Corn Soup with Vegatables


This is a recipe to chase away the winter-blues. One winter evening I was visiting my friend Ikki , when she enthusiastically offered me a bowl of Sweet-corn soup. That wasn’t exactly my idea of comfort-food till then, but I surprised myself, asking for more helpings! This recipe has ever-since been a winter-staple at our home and my best customer for Sweet Corn soup is Blu . You can never go wrong making this (and more importantly its healthy) ; you can take off couple of veggies from the list or add more … toss out the corn-starch and you get a clear soup,. (And if you are a non-vegetarian, add some shreds of cooked chicken and Voila! you have Sweet Corn ‘Chicken’ soup)

Prep time: 15 min
Cooking time: 30 min
Ready in: 45 min

Makes 4-6 servings

Ingredients:
• 2 cups vegetable broth (or chicken broth, if you want the non-vegetarian version)
• 3 cups water
• 1 cup carrot (~ 1 big carrot shredded or julienned )
• ½ cup celery ( ~ 2 stalks cut into small pieces )
• ½ cup spring onion (~ 1 bulb cut into small pieces )
• ½ cup red or white onion (~ ½ a medium onion cut into small pieces)
• 1 cup sweet corn ( fresh or canned )
• ½ tsp salt ( or to taste)
• 1 tbs corn starch ( mixed in 1 oz water )
• 1 egg ( optional)
• Crushed Pepper for garnish ( optional)

You will also need:
• A medium pot

Procedure
:
• In the pot combine the stock and water. Set in medium heat and bring to a boil
• Add the vegetables and salt. Let it simmer for about 10 min ( till the vegetables are cooked )
• In case you are adding egg : Beat the egg in a small bowl and with pour it in a stream into the boiling soup**
• Stir in the corn starch
• Sprinkle the crushed pepper before serving (optional)

Suggested accompaniments: Toasted Garlic Rolls

Life saver:
** To avoid blobs of cooked egg in your soup ( like what you see in my picture ; I got a little clumsy this time) pour the beaten egg in a very slow & steady stream from above the pot .To get the best threads, keep stirring while you are pouring the eggs; at least for a minute. Stir in one direction only.

Note : The nutrition information provided below is for the Vegetarian version of this recipe, sans the egg.