Fruit & Veggie Salad.. with Sweet and Sour dressing


This is very light and fruity salad to perk up a summer meal. I have made this a couple of times now with different kinds of fruits .. this combination turned out to be the best. However , there is still no dearth of combination s if you are willing to be creative : apples, pears, strawberries , grapes,carrots, green onions... anyone ??


Ingredients
2 cups of pineapple chunks
1 cup peeled oranges
1 cup of cherry tomatoes
1/2 cup pitted black olives
1/2 cup pickled sweet peppers

For the dressing:
1 tbs of extra virgin olive oil
1 tbs of lemon juice ( or lime juice)
1/4 tsp of black pepper powder
1 tsp sugar
salt

How to go about
  • In a bowl whisk together the ingredients for the dressing. Please note that the measurements are variable; you could omit the pepper or sugar, tone down the lemon part for a less tangy version... just play around till you get it right for your palette.
  • Toss in the fruits and veggies and mix well
Sit back and enjoy your salad :)

Happy weekend everyone !!

Strawberry Jam


The so far mild-summer in the valley is almost over, hopefully ; and our household is desperately exploring creative ways to entertain the little chimp here . One such sunny day, we took a drive to an organic-strawberry farm nearby ,to re-orient with the elements. After half a day of pretend-driving the tractor, pulling the wagon, petting the horsey , picking rocks and eating berries right off the vine we got back home with a nice tan and a big basket of juicy and sweet strawberries.

Left to Blu, he would have finished off the berries in a day. However, we had had such a relaxing time at the farm that I wanted to preserve the moment forever.. well, I had enough photos to preserve the "forever" part and for fear for my baby ending up with a bad tummy , decided to make a quick preserve out of the berries.

A quick search on the internet got me this** video. I altered some of the ingredients but followed the general guidelines from the instructor regarding the strawberry-sugar ratio and the canning tips. While making the jam it took much longer than quoted in the video and but it really helped to see how the instructor was checking the consistency of the jam and did the canning. Here is the recipe of what I did with the alterations .

Prep time : 20 min
Cook time : 1 hour (plus)
Canning time : 10 min for bottling + 15 min in the waterbath
Ingredients

6 cups of diced strawberries
2 cups of table sugar
1 tsp dry ginger powder
2 tbs of lemon juice
6 cloves

Yields : Enough to fill 2 pint size jars

Procedure
In the order
  • Set 2 small plates in the freezer for testing the jam consistency ( these will be used later in the process ).
  • Fill a large pot with water and bring it to a boil. Slowly drop the glass jars in there ( for sterilizing them)
  • In a smaller pot sterilize the lids also similarly.
  • In a large pan combine the strawberries , sugar, lemon juice, ginger powder and the cloves*
  • Set in medium heat and keep turning with a heat-resistant spatula.
  • It will take you anywhere from 30 min to 1 hr for the water content of the strawberries to evaporate and get the jam to the required consistency.
  • To test the consistency of the jam, take about a teaspoonful and drop it on one of the plates from the freezer. Let stand for about 15 seconds. Then tilt the plate; if the juice is still running around like a syrup it means the jam is not done yet. When it is done you will see that some of the pulp remains in place when tilted and the syrup has thickened. ( Shown in detail in the video). Take it off the stove.
  • Using a jar lifter ( or a set of tongs) carefully lift the bottles from the pot making sure to empty all water from them. Please be extremely cautious while doing this. There is no need to wipe the bottles .
  • Spoon in the jam into the bottles .
  • Carefully left the lids from the pot and set them on top of the bottles. Fasten the ring to the tightest.
  • Using extreme caution , put the closed bottles back into the big pot of water. Leave it in the boiling water for another 15 minutes.
  • After 15 min , bring it out of the waterbath and let cool for about 12 hours. Now the jam is ready , canned well and would stay fresh for atleast 6 months.
*If the thought of biting on a clove while having your toast doesnt sound appealing , you could do a bouquet garni : make a small sachet out of some cheese cloth and wrap the spices in it and then let cook with the jam. When the jam is ready toss out the sachet, before the canning.

**Please note that my contribution to this recipe and the process is only the ingredients and the labor. There are several different canning methods being practiced all over the world, in fact some are simpler than the waterbath method. I encourage you to do some research on other canning methods before you start off; as you might have figured already the entire process can be rather tedious . The video in the link belongs to Marge Braker of Preserve an I have provided you with the link because I found it useful and empoyed her method to do the canning.

Jello n Fruit

"How-to-WOW-your-kid 101"


Prep Time :10 min
Ready in : 4 hours

Makes 8 servings


What you will need

1 cup of canned* crushed- pineapple
1 cup of pineapple juice ( you can also use the juice drained out from the crushed pineapple)
2 cup water
6 oz packet of strawberry JellO

How to go about
  • In a medium saucepan bring 1 cup water to a boil.
  • Remove from heat and sprinkle in the JellO powder.
  • Stir well for about 2 minutes, till the powder dissolves.
  • Add the remaining 1 cup water and the pineapple juice. Stir.
  • Add the crushed pineapple and Stir.
  • Pour into ramekins or dessert bowls and refrigerate for at least 4 hours before use .

* Make sure to use canned or cooked pineapple while making this. Fresh pineapple contains an enzyme which prevents the gelatin from setting. Read more

Coleslaw & A Yummy Sandwich

I just gobbled up what you are seeing in the picture .. It looks a plain-jane plate , but I must say, it IS one super-duper sandwich once you take a bite !
Coleslaw is my favorite summer-salad.. Well! I do make it in all seasons , but when I think of Coleslaw , summer BBQs comes to my mind ... and in winter I make it just to re-live those summer moments . I do make some other versions of it too , and I will post them in due course of time (... well, that is as soon as the grill is fired up next !)

Now that we are talking about this much savored salad, and if you feel like reading a bit more on who made it first , or the different variants of it , or how the name came to be... Click here;
Wiki has an entire page on it :)

In the meantime, here is the recipe:
(makes 4 servings)

Ingredients:
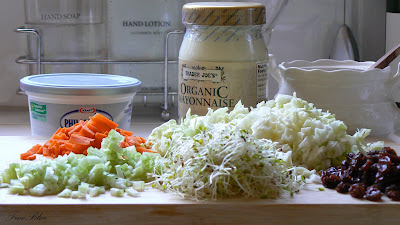
1 cup shredded Cabbage
1/4 cup grated Carrot ( optional)
1/4 cup minced Celery
1/4 cup Alfalfa Sprouts (optional)
1/4 cup Raisins ( or dried Cranberries)
1/4 cup chopped Cashew-nuts ( or pecans , again optional... i love the crunch it gives!)

2 tbs of Mayonnaise
1 tbs of Cream Cheese
1 tsp sugar
A pinch of black-pepper powder
A pinch of salt

How to go about :
  • In a medium bowl combine the Cream Cheese, Mayonnaise, Salt , Pepper and Sugar
  • Toss in all the other ingredients (mentioned above) and mix well
....and Voila !!
To make the sandwich: Toast Bread , slather a lavish spoon of the slaw on one side and top with another slice of bread . Yumm... !! I have noticed that if stored in a sealed container and refrigerated , this coleslaw keeps well for at-least another day . More tips on storing coleslaw.

This salad is a great way to incorporate something as nutritious as Alfalfa Sprouts.
Please note that the nutrition data I have provided is approximate and for 1 serving, and is calculated with all the ingredients listed above.

Happy Summer Meals to you !

Fish Moily with Halibut


I have been scouring the internet for the past couple of hours trying to find the origin of this curry. Any mention on the history was available just in this blog and it has the recipe as well. Though fish Moily is very famous in Keralite Christian cuisine, the combination of ginger-garlic with coconut in a fish preparation somehow made me think that it could have been from another cuisine. My reference says that it is a Goan recipe.. please do correct me if am wrong.

Fish Moily is not a very common preparation amongst the cooks in my family. And the couple of times I have had it was with friends while visiting. This is my first attempt at making Fish Moily, and the guidelines are from my friend,Minnu. In Kerala, it is traditionally prepared with Karimeen (Pearl Spot) or Aavoli ( Pomfret) , the marinated fish is fried first ( to avoid the flesh from breaking up when cooking in the gravy) and the cooked in the coconut milk gravy. Here I have used Halibut and because Halibut's flesh is more firm, I have omitted the frying-part and cooked it straight in the gravy . So you see there are some definite deviations from the traditional recipe , needless to say..this is my easy-version. Well, it didn't matter that I cheated a little because in the end it all worked out :)

Prep time :15 min
Cook time:10 min
Ready In :25 min

Makes : 4-6 servings

Ingredients
  • 1 lb halibut ( cut to small pieces )
  • 2-3 tbs of cooking oil
  • 15-20 pepper corns
  • 5 cardamom pods
  • 5 cloves
  • 1 small piece of cinnamon
  • 1/2 tsp of fennel seeds
  • 1 big onion thinly sliced
  • 3 big cloves of garlic
  • 1 medium piece of ginger ( should yield about the same quantity as the garlic)
  • 2-3 green chillies ( use less for less heat) slit length-wise
  • 1/4 tsp turmeric powder
  • 8 oz of thick Coconut Milk ,divided into 2 portions (I used the Chaokoh brand)
  • 2 cups of water ( use less if you want a thicker gravy)
  • Salt to taste
  • 1 tsp of white vinegar
  • 1 tomato cut into rings , for garnish (optional)
Procedure
  • Grind the Ginger and Garlic to a fine paste.
  • Set a large pan in high heat and once it is hot , add the oil.
  • Add the whole spices (pepper, cardamom,cloves, cinnamon and fennel), and reduce the heat to medium.
  • When the spices are fragrant, add the sliced onion and green chillies turning them with a spatula every now and then.
  • When the onions turn translucent, add the ginger-garlic paste and salt. Keep turning till everything turns golden brown.
  • Thin down 4oz of the coconut milk with 2 cups of water and add to the fried onions. Bring the sauce to a simmer.
  • Add the fish pieces and let cook for about 10 min ( The flesh turns from pink to white by the time the fish is cooked )
  • Once the fish pieces are cooked turn off the stove and add the remaining 4oz of thick coconut milk.
Garnish : Slice tomatoes in rings and fry slightly in oil. Serve the fish with the sauce/gravy , garnished with the fried tomato-rings.

Spinach Saute

Prep time :10 min
Cook time :15 min
Ready in :25 min

Makes : 4 servings

Ingredients
  • 2 tbs of cooking oil
  • 1 medium red onion, cut thinly lengthwise
  • 12 oz spinach ( 1 small bag )
  • 1-2 green chillies, slit lengthwise
  • Salt to taste
You will also need
  • A large pan

Procedure
  • Wash and roughly chop the spinach
  • Set the skillet in high heat, and add the oil
  • When the oil is hot, add the onion slices and the slit green chillies and and wait for them to brown, turning slightly with a spatula
  • Add the chopped up the spinach
  • Add salt
  • It will take about 10 min of high heat for the water content to dry up. Turn with a spatula till it starts getting slightly crisp.
  • Remove from heat
Afterthoughts: I enjoyed this saute with some Rice and Yogurt today. I think it will also make a great side for Indian breads like Roti or make a nice sandwich with toasted-bread and some melted cheese.

Chemmeen Varuthathu

Fried Shrimp/ Prawns


Here is something for seafood lovers. It is a basic recipe for shrimp-fry that would serve well as an appetizer or with any rice dish.

Prep time: 10 min
Cook time : 20 min
Ready in :30 min

Ingredients
  • 1 lb Medium shrimp , cleaned and de-veined
  • 1 cup pearl onions , crushed
  • 1 tsp coriander powder
  • 1 tsp red chilli powder
  • 1/4 tsp turmeric powder
  • 1/2 tsp pepper powder
  • 1/2 tsp fennel powder ( perum jeerakam)
  • salt to taste
  • 1 stalk of curry leaves
  • Oil to fry ( about 2-3 tbs)
Procedure
  • Set the shrimp in a medium pan/ Skillet in medium heat
  • Add the onions, coriander powder, chilly powder, turmeric powder, pepper powder, fennel powder , salt and curry leaves
  • Cook till the shrimp is cooked and the water-content dries up ( the shrimp would now have a nice coating of the spices and powders by now)
  • Add the oil and saute for about 8-10 min ( till the coating on the shrimp gets a little crispy)
Happy Cooking !

PS: This one is on-demand from my friend,Veena .

Kozhukkatta

Steamed Rice Dumplings with Sweetened Coconut filling.


One of my favorite snacks from childhood days .. I have had it made in couple of different ways ; with fillings sweetened with sugar or jaggery and then one without any filling.
It was also probably my worst nightmare of a snack while staying in hostels, away from home, for studies. Most school and college hostels in Kerala make this for an evening snack; and probably because it is made in large scale there is hardly any "sweet-surprise" inside the rice layer and therefore end up absolutely tasteless. So one can only imagine how Kozhukkatta has acquired the pet name "la bombe"!
My love for Kozhukkatta is mainly for the really really gooey jaggery-filling. I pack so much of the stuffing in it that by the time the dumplings come of the steaming, they are almost oozing the syrup from all sides. The ratio of the coconut-jaggery mixture is totally dependent on how much sweetness you want , and hence I am not mentioning exact amounts for them. So here is the recipe :

Ingredients:
  • 1 cup Rice Flour ( the finely powdered and roasted variety, used for Idiyappam )
  • 1 cup water ( 1/2 cup more, if needed)
  • 1/2 tsp salt
  • 1 tbs cooking oil
For the filling
  • Shredded coconut
  • Jaggery ( I used approximately 1:1 ratio for coconut and jaggery)
Procedure:
  • Grate the jaggery & mix well with the coconut.
  • In a medium saucepan boil the water. Add the salt and the oil.
  • Remove from heat
  • In a steady stream add the rice flour and stir ( i prefer to use the handle of a wooden spoon to do this )
  • Keep mixing till the mixture forms a smooth dough. (In case the it gets dry, add some more boiling water, about 1/2 cup more )
  • As soon it cools down to a temperature you can handle , make small balls out of it ( 1 cup of rice flour should yield about 7-8 of these )
  • Grease your palms with some oil, and lightly flatten each ball ( Keep the dough on your left palm , press gently to make a 2"circle)
  • Put 1 teaspoonful of the filling in the center of the circle and bring the outer-edge together to cover it. ( I wish I had a pictorial to explain this ..Hope to post one soon). The dumplings eventually would like the ones in the picture.
Happy Cooking !

Eggless Chocolate Mousse


It is a typical case of mis-communication ! My friend makes one killer Eggless Chocolate Mousse .. he happens to be a pastry-chef. So the last time we met up I mentioned how good it was; seriously it was not in my intention to extract any of his trade secrets. But being the gentleman that he is he offered up the recipe . However, the recipe was lost in all the hustle n bustle at the restaurant . A very regretful me got back home , still determined to try out the mousse from whatever parts I remembered and then some common-kitchen-sense.
I started out with extra portions of all the ingredients so as to deal with any oncoming disasters. By now I am sure you would be wondering"" why is this woman even posting this recipe ??"" .So, let me assure you the outcome wasnt all that bad. On the good side, it is very easy to make and doesnt have any eggs in it ..on the flip side, if you dont like the bitter sweet taste of chocolate, this is not for you (but then you can always substitue another kind of chocolate if you dont like the taste of semi-sweet )

Ingredients:
  • 1 cups (8 oz) Heavy Whipping Cream
  • 4 oz Semi Sweet Chocolate
  • 8 oz Whipped Cream
Procedure :
  • In a heavy bottom pan heat the whipping cream and chocolate. Bring it to a boil.
  • Let cool
  • Once it cools down , fold in the whipped cream.
  • Refrigerate for 4 hours
Serve in scoops or garnished with fresh berries.

Recipe for Hot &Sweet Chicken and the newest addition to our pantry.


Chilli-Chicken , the Indo-Chinese preparation, is one of my all time favorites. There are many restaurants in Kerala who make this exceptionally well , at least there used to be. There are couple of Indian-restaurants here in valley who make really tasty versions of it. However, I am in constant fear of what salts are going in them and hence decided to try and make it at home. I was not following any recipe , and just used some sauces and other ingredients which I thought I had tasted in the traditional preparation. Guess what I ended up with , a really great recipe for Hot-n-Sweet Chicken. So while my quest for the Chill-Chicken continues, I would love to share the Hot-n-Sweet recipe with you all.
A friend told me that it is the Chilli sauce that makes all the difference in these preparations..sadly enough I forgot to ask her for recommendations. Later on went ahead and got a bottle of the Tabasco Green Chilli Sauce , and I have used it rather liberally here in this recipe.
I made this quite late in the evening and had a rather hungry group waiting for the grub. No need to mention, the portion vanished before I could take a picture. So please excuse me for not putting up the photo this time. However if you do get to making this at home you are more than welcome to send me a shot , and I will make sure to post it here ( of course, with due courtesies !). Happy Cooking everyone !

Yields : 6-8 servings
Prep time : -15 min for prepping the marinade
-Overnite for the marinade
-30 minutes before serving

Ingredients:
  • 1 lb boneless, skinless chicken breasts ( cut into small bite size pieces )
For the batter
  • 3 Green chillies ( I used the Thai ones , you could use any small hot variety )
  • 4 medium cloves of garlic
  • 1" piece of ginger
  • 1 tbs Soy Sauce
  • Salt
  • 1/2 tsp Crushed pepper corns
  • 3 tbs corn starch ( mixed in 4 oz/ half glass water)
Other Ingredients
  • 1 cup oil for deep frying
  • 2-3 Tbs oil for the saute
  • 4 medium cloves of garlic minced
  • 1" piece of ginger minced
  • 3 Tbs of tomato ketchup
  • 2 Tbs of green chilli sauce
  • 1 Tbs of Soy Sauce
  • Salt
  • 1 tsp Crushed Pepper Corns
  • 1 big onion ( cut into 1" squares / chunks)
  • 2 bell peppers ( cut into 1" squares )
Procedure:
  • Making the batter :Grind together green chillies, garlic and ginger to a smooth paste. Mix the corn-starch in water. Add salt, pepper and the ground paste. Mix well.
  • Toss in the chicken pieces to the batter and leave covered in the refrigerator, overnight.
  • Deep frying the chicken pieces: In a medium pan heat oil. Fry the chicken pieces in small batches , each batch should take about 5 minutes to be cooked. Leave the fried pieces on a paper towel to absorb the extra grease.
  • Making the stir-fry: Set a large skillet in high heat and add oil. Once the oil is smoking hot toss in the minced ginger and garlic.
  • Wait for the ginger n garlic to turn brown ; add salt , pepper and the sauces ( tomato, green chilly n soy). Mix well.
  • Add the fried chicken pieces and mix well so that they are covered well in the sauces.
  • Toss in the onion and bell pepper. Saute for couple of minutes in high heat.
  • Remove from heat.
LifeSaver : The salt, pepper, tomato sauce and chilly sauce quantities are variable. Check for taste in between and adjust the quantities accordingly.

Manga Chammanthi

Mango Chutney: A tangy chutney made of raw mangoes, coconut and mild spices.

It is almost Summer in India. By now the mango trees would be bearing fruits in full form.. At home they would be making all sorts of things with it... pickled mango, mango "achar", mango chutney, raw mango with fish curry,mango juice, ...and that slice from a juicy ripe mango! I would love to go on an on about how much I love mangoes,but I think it would be torturous ..to me and you (if you are a fellow mango-lover).

Here is a basic recipe for a much loved mango-chammanthi. Though Chammanthi translates to Chutney in English, I feel there is a difference in the consistencies; while chutney is more like a dip ( more water-content in it) chammanthi is more dry and holds shape after it is ground.My dad is a stickler for taste..there are somethings which he prefers to be made the conventional way, manga chammanthi is one of them. By conventional I mean the way it is made: stone ground. Though I have been true to the ingredients, since I don't have access to a grinding stone, I ground it in a mixie and hence got the mushier version.

Ingredients:
  • 1/2 cup of raw mangoes cut to small pieces
  • 1 cup of Grated coconut
  • 2-3 pearl onions
  • small piece of ginger
  • 1 stalk of curry leaves
  • 1 tsp kashmiri red chilly powder
  • salt to taste

Procedure:
  • Grind all the ingredients together

Cherry Tomato Snack

Spring is in the air! This year I want to try growing some tomatoes (..again!). The last couple of attempts went totally awry .. either lack of watering or too much of it, once there were bugs all over the vines and once i even blamed it on the pot ( it was retaining too much water)! On my last grocery trip, I got an issue of Martha Stewart Living in which there is an article "Tomatoes for all spaces".. so , I am all set now. I would like to tell myself that my black thumb is slowly turning green ; at-least the darkest shade of green :) So today I am off to buy some potting soil and some tomato-plants.. hoping to reap a bounty ( or in the least, a handful).
In the meantime , I would love to share with you this super-easy, healthy and beautiful salad/ snack that I had at one of the parties recently.

Ingredients:
  • 1 pint Cherry tomatoes ( or any small variety of tomatoes)
  • 2 tbs Sour cream
  • 1 tbs Capers
  • Salt to taste
  • 1/8 tsp Crushed peppercorn or to taste
Procedure:
  • Halve the tomatoes .
  • In a small bowl mix the sour cream, capers, salt and crushed pepper
  • Put a dollop of this mixture on to the tomato ( If you have a pastry bag and tips, you could even use that ..just make sure to use a wide-tip so that the capers can pass through.
Happy Snacking !

Ethakka Appam

Ethakka Appam : Plantain Fritters

Plantains are quotidian in Keralite cooking. We have found ways to incorporate them in pretty much all meals : Ripe plantains as a fruit or snack, Steamed ripe-plantains for breakfast, Plantain fritters as a snack,Plantains cooked in coconut milk for dessert , Plantain Pulisseri & Pachadi with rice and the list goes on.
Plantain fritters are much sought after snack for us. The ripe plantains are thinly sliced, dipped in a sweetened flour batter and then deep fried. Here is how to go about :

Prep time : 10 min
Cooking time : 20 min
Ready in : 30 min

Ingredients:

  • 3-4 Ripe Plantains
  • 1 cup of all-purpose flour or maida
  • 1 cup of water ( or maybe 1/4 cup more if needed.. the plan is to get a batter loose enough to thinly coat the plantain slices)
  • 1/4 cup of sugar
  • 1/8 tsp of salt
  • a pinch of powdered cardamom (optional)
  • 1 cup of cooking oil ( or just enough for deep frying the plantain slices)
You will also need: A small shallow pan & a medium bowl

Procedure:
  • Peel the plantains. Cut them across in two or three. Slit each piece into 1/2" thick slices.
  • In the medium bowl combine the flour, water, sugar, salt & cardamom powder. Whisk into a smooth batter
  • Set the pan in medium heat and once hot, add the oil and wait till it is hot enough*.
  • Dip the plantain slices in the batter, so as to cover all sides evenly and carefully immerse in the oil (I use a fork to do this.. you can use any gadget that suits you so long as you don't burn yourself in the process).
  • Repeat with more slices , making sure not to overcrowd the pan ( about 3-4 slices in one go)
  • Turn them over once they turn golden brown on the sides. Fry till they are evenly golden brown on both sides.
  • Carefully transfer them to a plate lined with paper-towels ( to absorb the extra grease).
  • Serve hot as a snack with tea or coffee :)
Lifesaver : * The fritters wont be half as fun if they are not fried at the right temperature. Here is a simple test to check if the oil is hot enough. Put a small drop of the batter in the oil. If it sinks all the way in , the oil is not hot enough. If it just floats on the surface and turns burnt right away it is too hot. Around the right temperature, it would just sizzle and gradually turn a golden brown.

Kaachiya Moru

Kachiya Moru : Butter-milk seasoned with mild-spices.

This is probably one recipe that evokes most memories for me. The other day I was taking this picture and Joe came with a very intrigued look and aired " are you sure you want to post the kachiya-moru ..it is hardly a recipe".. that's how simple it is to make this curry. No wonder it is such an indispensable item in the day-to-day cooking of a Malayali. The one I am making here is the basic version. The other variations involve the addition of coconut , some more spices and fruits/ vegetables and is then called Pulisseri.
Though the term "kachiya" means heated/ boiled , this curry is hardly brought to tepid temperature to avoid the curdling of the buttermilk. I have seen various methods employed to do this ..my grandmother would just keep the bowl on the stove in low heat and then stir it gently throughout till it just begins to heat up ; my mom-in-law keeps the bowl in a larger bowl with hot water( not on the stove) and stirs the curry till it gets to the right temperature.

Ingredients:
  • 2 cups Plain Yogurt
  • 1 cup water
  • Salt to taste
  • 1/2 tsp red-chilly powder
  • 1/4 tsp turmeric powder
  • A small pich of fenugreek powder
For the seasoning:
  • 1 tbs cooking oil
  • 1/2 tsp black mustard seeds
  • 1 dry red chilly
  • 1 stalk of curry leaves
You will also need : Medium bowl & Saucepan

Procedure :
  • In the medium bowl combine the first batch of ingredients : yogurt, water, salt, turmeric, red -chilli & fenugreek powders. You could use a wire whisk or a hand-blender or even just a plain spoon; the plan is to have a smooth sauce avoiding any clumps of the dry ingredients.
  • Set the saucepan in medium heat and add oil. Once it starts smoking , add the mustard seeds and wait to pop. Lower heat, add the red chilly & curry leaves.
  • Remove from heat. With caution , add the buttermilk mixture to the seasoning & keep stirring gently till the mixture gets tepid. ( I have noticed that the buttermilk warms up with just the heat from the seasoning. So you may not need to take it back to the stove after-all)
Kachiya Moru is a great accompaniment with rice , rice porridge (kanji) and also to just plainly sip on-n-on. As I mentioned , this curry keeps a very special place in my thoughts. My grandmother has this curry everyday single day with rice, from as far back as I can rememeber..and as her choicest brat, I stick to her tradition whenever I am home with her.


For the girl who loves balloons!

Last weekend couple of us friends got together to give a surprise-baby-shower for a friend, Heera: the girl who loves balloons. The plan was for all of us to get-together at a common point and then barge into her house.... for the most part it worked ; some got delayed due to infant/toddler emergencies. It was potluck party with a very relaxed menu and lots of gifts and goodies for the expectant-parents. Good friends, Good fun, Good food ..and some harmless Gossip.. cant think of anything better to brighten up a cold & rainy day!

Above: The cake we made for her. Yellow cake with butter-cream icing. I wish I had practiced a bit more before doing the icing .. the blue zig-zag you see here was supposed to have been shells and the center was to have a baby-silhouette according to my original plan. However, there were some last-minute mishaps and this is what we ended up with. Nevertheless, it ended up pretty edible!

A special note to Heera & family.. Best wishes as you await the new arrival !

Puli Meen


From the Keralite cuisine , Fish in *Kudam Puli- infused Spicy Gravy.

This is a household recipe for many Keralites. Kerala is a state in Southern India , blessed with a very long coast- line. Because of the proximity to the sea and subsequent availability of a variety of fish , majority of Keralites are fish-lovers. Most of our households are blessed with wonder-cooks ( also called "mom"s) who have myriad marine-recipes up their sleeves, to include fish in our daily-diet without causing much boredom to the palette.

My method of making
Puli-meen has evolved from a combination of my mom's and my mom-in-law's methods. My mom has been making Nei-meen ( Indo Pacific King Mackarel/ Seer Fish) curry like this from the time I could remember, and we used to call it **Mulaku-Curry , maybe because of its red-hot-colour. After I got married, I heard Joe rave about his Amachi's (mom's) Puli-meen, and the way he described it , I was sure it was the same Mulaku-curry with a different alias. I had the original recipe from my mom; so during one of my trips to India , I convinced Amachi to let me help her make it. Puli-meen , as Joe claims, is a very Syrian-Christian way for preparing fish with with ginger, garlic, onions and some spices. For the tangy part, Kudam-puli is added instead of tamarind. After couple of attempts, I managed to make a version of Puli-meen in my kitchen, which Joe certifies as " the closest in taste to the authentic one".
Traditionally in Kerala , fish curries are cooked in clay pans ( called
"man-chatti"). It is amazing how this can change the flavor of the curry, and keeps the fish moist even with very little gravy. I managed to get a chatti from one of the Indian grocery stores here in the Bay-Area couple of years back and have been cooking fish in it eversince.

Ingredients:


  • 4 tbs cooking oil
  • 1 tsp black mustard seeds
  • 1 tbs grated ginger ( approximately 1/2 of medium knob)
  • 1 tbs minced garlic ( approximately 4 large cloves)
  • 1/2 cup of pearl onions sliced into quarters
  • 1 stalk of curry leaves
  • 1 tsp coriander powder
  • 3 tsp red-chilly powder ( I prefer to use Kashmiri red-chilly powder)
  • 1/8 tsp fenugreek powder
  • 1/4 tsp turmeric powder
  • 5 slivers of kudam-puli (leave soaked in water for about 5 min before using)
  • 2 cups of water
  • Salt to taste
  • 15-20 pieces of fish ( I used 2 fillets of tilapia )
Cookware : A medium pan ; I prefer to use the man-chatti mentioned above.

Procedure:
  • Set the pan in medium heat and add the oil.
  • Once the oil is smoking hot add the mustard seeds and wait for them to pop.
  • Add the ginger, garlic , curry leaves & onions and saute till they start turning brown.


  • Lower the heat.Add turmeric, red-chilly,coriander & fenugreek powders and saute well ; till they turn really dark in color, almost the darkest brown.
  • Add the water. Once it starts simmering, add the salt & kudam-puli.
  • Let simmer and then add the fish pieces. Cook for for about 10 min. (Cooking time for the fish will vary depending on what variety you use. Adjust accordingly)
Suggested Accompaniments : Rice, Kappa Puzhukku( Mashed Tapioca with Seasonings)
Lifesavers : To get the distinctive flavors of the authentic recipe it is advisable to use traditional ingredients . For eg. substituting the pearl-onions with big onions , would make the gravy a lot milder in taste , because the big onion is sweeter.
* Kudam-puli ( Gambooge) is a fruit indigenous to the South-Western cost of India. The fruit is well known for it's culinary and medicinal uses. The seeds are removed and the rind is sun-dried before it is stored for later use (Available at most Indian stores in the US). It is also well praised for its medicinal value as a digestive aide.
**Mulaku : Chilli


Garlic Rasam


Rasam: Tomato broth with Spices . It is a very common preparation in South India and each region has various versions of it . The basic ingredients are Tomato, Tamarind and some spices . Some prefer to have it as a Soup, where it has the broth like consistency and some like it with rice.

The last week has been bad for me ..It was raining all along and I have caught a cold. Thankfully the two men in the household are up and about and a creating as much of a mess they can with no one to police them. I had a good laugh when another mom from Blu's Class said to me the other day " I would rather my husband or my kid falls sick ..cos if I fall sick the house stops running and it is just chaos".So there I sat, looking almost like Rudolph, with a very red nose (from all the sneezing) and wondering what would help me do away with the sniffles ? The first thing that came to my mind was
Rasam.

Before I get to the recipe , I should tell you a little bit about the person who taught me how to make this. I am blessed to have an amazing cook as a very good friend and next-door neighbor. She is my one-stop-rescue-point for convenient Vegetarian (
Tamizh style) cooking. Rasam is an indispensable item in her diet and, me being a constant visitor at her place, I get to savor it every now-and-then. Her garlic-rasam is a little thicker in consistency than the broth and is a great accompaniment with rice.

Prep time :10 min
Cooking time : 15 min
Makes : 4 servings

Ingredients :
  • 2 large tomatoes , cut into small pieces
  • 3 large cloves of garlic , peeled and crushed
  • 1 tsp of tamarind ( mixed with some water )
  • Salt to taste
  • 1 1/2 tsp of Rasam Powder
  • 2 cups water
For the Seasoning
  • 1 tbs cooking oil
  • 1 tsp black mustard seeds
  • 1/4 tsp cumin seeds
  • 1 pinch (1/8 tsp) of asafoetida
  • 1 stalk of curry leaves
Procedure :
  • In a medium pot cook together the tomato , garlic, salt & tamarind* with half cup of water. Keep Covered.
  • Once the tomatoes are well cooked , using a heavy spoon , mash up tomatoes in the water.
  • Add the rest ( 1 1/2 cups ) of water and let boil for couple of min.
  • In a small skillet, heat oil .
  • Add the mustard seeds . When the mustard seeds start popping , add the cumin seeds , asafoetida & curry leaves and remove from heat.
  • Add to the tomato broth & mix well .
Lifesaver:
*Add the salt and tamarind only in small quantities at a time . Taste in between to see if they are enough. Adjust the quantity accordingly.

Related Recipes : Rasam Powder

Rasam Powder

Prep time : 10 min Yields : Approximately 7 tsp

Ingredients
:
  • 6 tsp Yellow Pigeon Peas ( Thuvara Parippu/ Toor Dal)
  • 2 tsp Coriander Seeds
  • 2 tsp Black Pepper Corns
  • 1/2 tsp Cumin Seeds
Procedure :
  • Dry roast them in a medium skillet till the peas start turning brown.
  • Grind to a fine powder using a spice grinder .
  • Store refrigerated in an airtight container.

Brussel Sprouts


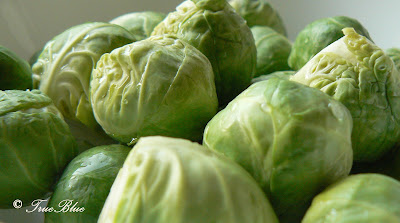
I was reading back on my previous posts the other day and felt the compelling need to cook , and subsequently post, some healthy recipes . So,I was pretty resolute on my last shopping trip and decided to cook some Brussel Sprouts for dinner. Though I felt proud of myself picking up that bag of tiny cabbagey- looking-veggie , I had no idea what-so-ever what I was going to do with it. So I decided to do some groundwork before dishing it up .
As it turns out , the tiny cabbagey-looking-veggie is indeed a variety of cabbage. The prefix "Brussel" was given to it probably because it was cultivated initially in Brussels , now Belgium. They thrive in less than tropical temperatures and probably that's why we don't find them in the Indian market. They are very rich in antioxidants, folic acid and dietary fiber.
The easiest way to include these in you diet is to probably make a salad ; steaming it and then seasoning with salt & pepper. However, I was in a mood to eat some comfort food that day...and needless to say , to a Keralite comfort food has to include rice. That ruled out steamed-sprouts-delight and I was left with two options: a
thoran* or a mezhukkupuratti**. Since it is a variety of cabbage and I love Cabbage thoran the final decision was Brussel Sprouts Thoran.
While cooking the sprouts the only thing to keep in mind is not to over-cook them; about 5 minutes of cooking should be enough. When overcooked it tends to be foul smelling due to the presence of an organic compound , which incidentally, is the same compound that lends it the high-nutrient quality. This is how I made the
thoran :

Prep time :15 min
Cooking time :10 min
Ready in :25 min

Ingedients:
  • 1 lb Brussel Sprouts
  • 1/4 tsp turmeric pwd (optional)
  • Salt to taste
  • 2 tbs grated coconut ( fresh or frozen)
  • 2-3 pearl onions
  • 1 green chilly ( I used a Thai chilly)
  • 1 stalk of curry leaves
  • 1 dried red chilly
  • 1/2 tsp black mustard seeds
  • 1 tbs olive oil


You will also need:
  • 1 medium skillet
Procedure:
  • Wash the Sprouts and slit them in half, running the knife from top to bottom. Cut each half , lengthwise into thin pieces.
  • Coarsely grind together the coconut, onions, green chilly and curry leaves.
  • Set the skillet in medium heat. Add the oil and once it starts smoking add the mustard seeds.Wait for them to pop , and then add the red chilly .
  • Toss in the Sprouts ; add the salt& turmeric powder; keep covered and let it cook in the steam for about 5 min.
  • Remove the lid , add the ground coconut mixture and toss with a spatula. Keep covered for another minute .
  • Remove the lid and check to see if the seasonings are right. Toss lightly with a spatula and remove from heat.
Note : The nutrition information provided below is for 1 serving.


*Thoran : From Keralite cuisine , a dry vegetable side dish with coconut .The vegetables are steamed/ cooked with salt, turmeric powder & chilly powder (optional) and then a coarsely ground mixture of coconut & pearl onions is added. Finally, seasoned with oil,mustard seeds , curry leaves & dry red chilly.
** Mezhukkupuratti: From Keralite cuisine , a dry vegetable side dish. The vegetables are steamed/ cooked in turmeric, red chilly pwd (optional) and salt and then
pan fried with sparse oil.

Ma's Butter Cake


As the title says, this is my mom’s recipe for a simple butter cake. Maybe “simple “ is a little misleading in this case ; it used to take a good 2 to 3 hours for mom from sifting the flour to getting the batter into the oven. This time it took me about an hour to do the prep work, with Blu behind my back checking “if the cake is ready?”. To a cooking-novice the procedure given below might look a bit daunting.. but let me tell you this , it will be worth all the effort.

Prep time: 45 min
Cooking time: 45 min
Ready in: 1 hr 30 min

Makes 16 (or more) servings

Ingredients:
• 1 cup all purpose flour ( 250 grams)
• 1 tsp baking powder
• 4 large eggs ( 250 grams, in room temperature*)
• 1 cup powdered sugar (250 grams)
• 2 sticks of un-salted butter (250 grams, softened in room temperature)
• ½ cup of 2% milk
• 1 tbs vanilla essence
• ½ cup raisins chopped( optional)
• ¼ cup cashews chopped (optional)
• ½ cup walnuts chopped (optional)

You will also need:
• Medium sized Sieve
• Small, Medium & Large Mixing Bowls
• 13”x9” cake pan
• Hand-held blender
• Rubber spatula

Procedure:
Prepping
• Using the sieve sift together the flour and baking powder. Repeat 2-3 times to ensure they mix well
• Separate the egg whites and the yolk ** making sure that the yolk doesn’t break and go into the white. Put the yolks in the small mixing bowl and the whites in the medium mixing bowl.
• Add a pinch of sugar to the egg whites and using the blender whip them till they start making firm peaks.
• Beat the egg yolks till they are all broken down and frothy.

Mixing them in
• In the large mixing bowl combine the butter, powdered sugar, vanilla essence and 2% milk .Beat them together in medium speed till they are well incorporated.
• Add one large spoonful of the flour and baking powder mixture and one large spoonful of the egg-whites into the butter & sugar mixture. Gently fold in*** using a rubber spatula, scraping from the sides as you go.
• Keep adding the flour & egg whites as mentioned above till the entire thing is well incorporated into the cake mixture.
• Add the egg yolks into it and fold in gently.
• Add the fruits and nuts**** and fold in gently.

Getting the batter into the oven
• Preheat the oven to 350 F
• Brush the inside of the cake pan with some butter. Add a tablespoon of flour to it and keep tilting and tapping the pan on the sides till the entire surface is coated with the flour.
• Add the prepared batter to it and bake for about 40-45 min**** or until a toothpick inserted comes clean

Lifesavers:
*It is very important that the eggs be used in room temperature since we want the egg whites to be whipped into firm peaks. The proteins in the egg-white expand better when they are warm. To test if they are right consistency, dip a spoon into it and draw it back; if the whites follow the trail and make a small peak you have got it right.

** For separating the egg whites from the yolk, holding the egg above the medium bowl gently crack them at the center with a knife. Without applying too much pressure open-up the crack and split into two halves, making sure that the yolk remains in one half shell, and letting the white drop into the bowl below. Now, gently slide the yolk into the other half of the shell, letting more of the egg white into the bowl. Repeat this until you have just yolk in the shell and all of the white has gone into the bowl. Try not to get the yolk in the white, it hampers the egg whites from stiffening up when whipped.

***Folding in: Gently run the rubber spatula on the sides on the sides of the bowl, scraping sides as you go, and in one direction. As you complete a circle, bring the spatula in a curved swoop towards the center (so that, all the batter you have accumulated from the sides will now go into the center). This is just a gentler way to get the mixture well incorporated making sure that the whipped egg retains the volume even after the mixing. If you stir briskly, the mixture would be deflated and lose volume, making the cake less fluffy.

**** Here is a tip to make sure that all the fruits and nuts don’t sink into the bottom of the cake while it is being baked. Add a spoonful of dry all-purpose flour to the fruits and nuts and toss well to coat them with flour all over, before you add them to the cake batter.

***** Baking time may vary depending on the individual oven-performance.

Note : The Nutrition Information provided below is for 1 serving of the cake, without the fruits and nuts.

Sweet Corn Soup with Vegatables


This is a recipe to chase away the winter-blues. One winter evening I was visiting my friend Ikki , when she enthusiastically offered me a bowl of Sweet-corn soup. That wasn’t exactly my idea of comfort-food till then, but I surprised myself, asking for more helpings! This recipe has ever-since been a winter-staple at our home and my best customer for Sweet Corn soup is Blu . You can never go wrong making this (and more importantly its healthy) ; you can take off couple of veggies from the list or add more … toss out the corn-starch and you get a clear soup,. (And if you are a non-vegetarian, add some shreds of cooked chicken and Voila! you have Sweet Corn ‘Chicken’ soup)

Prep time: 15 min
Cooking time: 30 min
Ready in: 45 min

Makes 4-6 servings

Ingredients:
• 2 cups vegetable broth (or chicken broth, if you want the non-vegetarian version)
• 3 cups water
• 1 cup carrot (~ 1 big carrot shredded or julienned )
• ½ cup celery ( ~ 2 stalks cut into small pieces )
• ½ cup spring onion (~ 1 bulb cut into small pieces )
• ½ cup red or white onion (~ ½ a medium onion cut into small pieces)
• 1 cup sweet corn ( fresh or canned )
• ½ tsp salt ( or to taste)
• 1 tbs corn starch ( mixed in 1 oz water )
• 1 egg ( optional)
• Crushed Pepper for garnish ( optional)

You will also need:
• A medium pot

Procedure
:
• In the pot combine the stock and water. Set in medium heat and bring to a boil
• Add the vegetables and salt. Let it simmer for about 10 min ( till the vegetables are cooked )
• In case you are adding egg : Beat the egg in a small bowl and with pour it in a stream into the boiling soup**
• Stir in the corn starch
• Sprinkle the crushed pepper before serving (optional)

Suggested accompaniments: Toasted Garlic Rolls

Life saver:
** To avoid blobs of cooked egg in your soup ( like what you see in my picture ; I got a little clumsy this time) pour the beaten egg in a very slow & steady stream from above the pot .To get the best threads, keep stirring while you are pouring the eggs; at least for a minute. Stir in one direction only.

Note : The nutrition information provided below is for the Vegetarian version of this recipe, sans the egg.

Panna Cotta


This Italian dessert literally means “cooked cream”. Though gourmets would prefer to make it with all cream, our version has part cream and part milk, which makes it a little lighter, but still as good on taste. A variety of toppings can be used with Panna Cotta. In the picture I have used a seasonal fruit-salad tossed with some honey. You could also use fresh strawberries, raspberries, blueberries, fudge sauce, chocolate sauce or a combination …there is no dearth of possibilities there. So, have fun doing the mix-n-match.

Prep time: 10 min
Cooking time: 10 min
Ready in: 4 hrs 20 min

Makes 8 servings

Ingredients:
• 1 ½ cup Heavy cream ( Whipping Cream)
• ½ cup white granulated sugar
• 1 ½ cup 2% milk
• 1 (.25 oz) packet unflavored gelatin
• 1 ½ tsp vanilla extract

You will also need:
• 1 medium mixing bowl
• 1 heavy bottomed medium saucepan
• 8 ramekins/ espresso cups/ dessert bowls

Procedure
• In the medium mixing bowl, combine the 2% milk and gelatin. Set aside.
• In the sauce pan combine the Heavy Cream and sugar and set in medium heat. Keep stirring till the mixture comes to a boil. Remove from stove.
• Add the milk and gelatin mixture to it** . Stir to blend.
• Add the vanilla extract. Stir to bend.
• Pour the mixture, equally divided, into the ramekins. Refrigerate for at-least 4 hours before serving

Lifesaver:
**While trying out any recipe with gelatin, to avoid clumping, make sure to mix it with a liquid in room temperature (in this recipe- adding 2% milk) before mixing it with a hot ingredient.

Note: The nutrition information provided below is for 1 serving

Caramel Custard


This heavenly tasting thing is an all-time crowd pleaser and Joe’s most favorite ; mine too . I think it originated in one of the European countries , most likely France, where it is called crème caramel. It is quite a popular dessert in India , where the custard is mostly made from scratch boiling down the milk ,egg and sugar mixture and then pressure cooked. After several unsuccessful attempts to re-create it here in the conventional oven , a friend of mine had a light-bulb moment : why not try making it like the Vanilla Flan , which is a traditional American dessert. So, with some tweaking , she successfully made and Indian style Caramel Custard in the conventional oven. Ever since I got this recipe from her I have made it and served it several times for family and friends ..and hope you do the same too.

Prep time :15 min

Cooking time :45 min

Makes 10 servings

Ingredients :

For the custard:

- 3 large eggs

- 1 14oz can sweetened condensed milk

- 14 oz whole or 2% milk

- 1 tbs vanilla essence

- 1 pinch of grated nutmeg ( optional: use it only if you like the spicy flavor)

For the Caramel Sauce

- ¾ cup granulated sugar

You will also need :

- 9” round cake pan or pie plate

- Medium Bowl for mixing the ingredients

- Small Saucepan for making caramel sauce

- Roasting pan / or any oven-safe pan bigger than the cake pan to make a water-bath

Procedure

  • Preheat oven to 325°F.
  • Heat the sugar in the saucepan over medium-low heat, stirring constantly, for 3 to 4 minutes or until dissolved and caramel colored. Quickly pour onto bottom of the cake pan ; swirl around bottom and sides to coat .
  • Combine milk and sweetened condensed milk, eggs and vanilla extract in medium bowl. Pour into prepared cake pan (which already has the caramelized sugar). Place cake pan in the large roasting pan; fill roasting pan with warm water to about 1-inch depth.
  • Bake for 45 to 50 minutes or until knife inserted near center comes out clean. Remove custard from water. Leave in room temperature to cool. Then, refrigerate for 4 hours or overnight.

    TO SERVE: run small spatula around edge of pie plate. Invert serving plate over the custard- pan. Turn over; shake gently to release. Caramelized sugar forms sauce.

Note : The nutrition data listed below is for one serving.